
How to Make a Sunflower Pendant with Miyuki Delica Beads
Create a three-part sunflower pendant using Miyuki Delica beads. This guide details the materials, raised petals, tubular finish, and provides a free pattern.
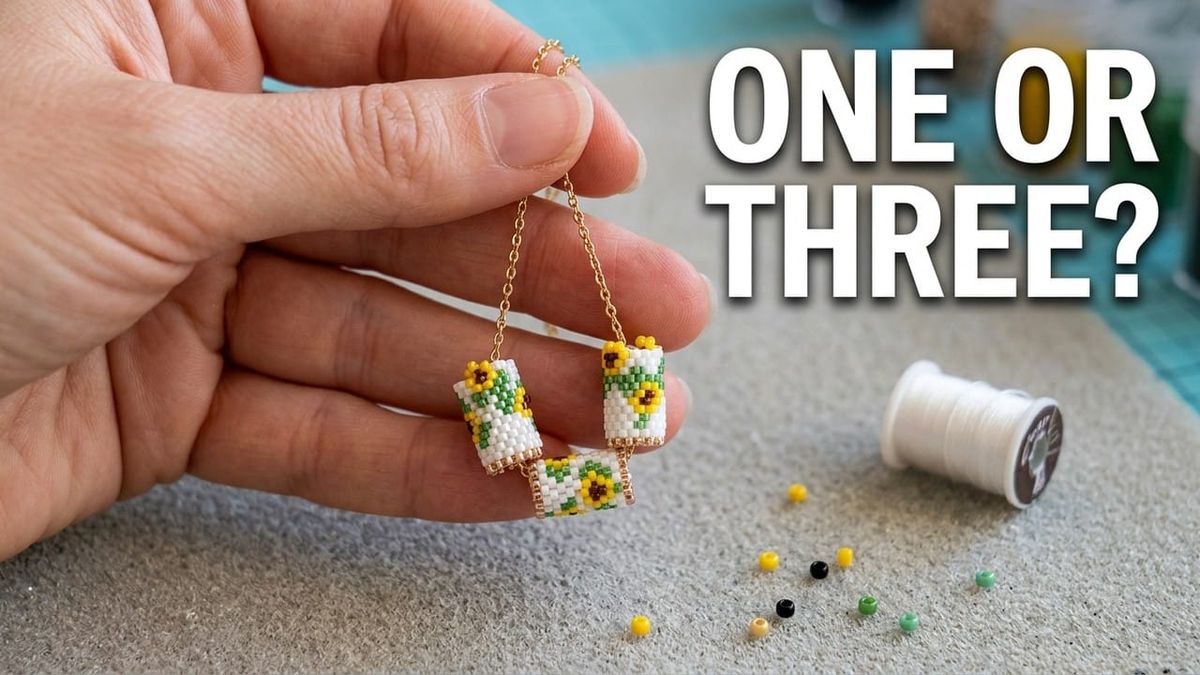
This sunflower pendant is crafted from three small tubular peyote pieces. The two outer sections feature yellow petals extending beyond the edge, while the middle piece has a straight rim. Thread all three onto a chain for a complete pendant, or wear just the center tube separately.
The video below demonstrates the entire process. The free pattern includes bead charts, a color key, quantities, and detailed thread paths.
Watch the complete sunflower pendant tutorial.
What you will make
The finished pendant has three separate beaded tubes:
- Two outer elements with raised sunflower petals along one edge
- One center element with sunflowers contained inside the peyote surface
Each element is stitched flat, joined into a tube, and secured separately. The openings allow the pieces to slide onto a fine chain or cord. In the video, the three elements move slightly as the pendant is worn.
Materials
You will need Miyuki Delica 11/0 beads in six color roles:
- White
- Yellow
- Light green
- Dark green
- Black
- Gold
The free pattern lists these totals for the complete three-piece pendant:
| Color | Bead count |
|---|---|
| White | 146 |
| Yellow | 72 |
| Dark green | 46 |
| Light green | 42 |
| Black | 12 |
| Gold | 48 |
You will also need white beading thread, a size 11 beading needle, scissors, a stop bead, and a chain or cord for the finished pendant.
The exact shades are up to you. The charts use letters for the six color roles, so keep your chosen colors matched to the same letters throughout the project.
Before you begin
Download the pattern and keep the chart beside you. Pages 4 to 6 show the complete left, center, and right elements. Pages 7 onward explain the outer element in smaller steps, including the raised petals and the final seam.
For each element, cut about 1 meter of beading thread. Add a stop bead and leave a tail of about 15 cm. The tail will be secured after the tube is closed.
1. Start the first outer element
Peyote stitch begins with rows 1 and 2 on the thread together. Pick up the first ten beads in the order shown on the outer-element chart, then slide them down to the stop bead.
For row 3, pick up one new bead, skip one bead from the starting row, and pass through the next bead. Repeat this rhythm across the row. As the next rows are added, the beads settle into the familiar offset structure that looks like a small brick wall.
Use the chart for the exact color order. Pull the thread after each bead so the rows stay compact and the Delicas sit neatly beside one another.
2. Add the raised sunflower petals
The raised flowers are the detail that separates the outer elements from the center tube.
After completing row 12, simultaneously pick up two yellow beads. Thread them through the four yellow petal beads already positioned around the black center, following their sequence. This forms a loop around the center and results in a six-petal sunflower extending beyond the edge of the peyote strip.
Continue with the next 12-row cycle. At the end of row 24, repeat the same petal step to complete the second raised flower.
This movement is easier to understand on screen. The video demonstrates it from 11:53.
3. Zip the strip into a tube
Fold the finished peyote strip so its two open edges meet. The protruding beads on both edges should alternate like the teeth of a zipper.
Pass the needle through one protruding bead on the left edge, then the next protruding bead on the right. Continue alternating from side to side until you reach the gold edge bead. Pull the thread so the seam closes and no gap remains between the beads.
The full zipping sequence begins at 18:34.
4. Secure the thread ends
Miyuki Delicas are precise enough to hold the thread securely without a bulky finishing knot. Pass the needle diagonally through several beads, change direction, and pass through several more. Repeat this a few times before trimming the thread.
Secure the starting tail in the same way. The first outer element is now complete.
5. Make the second outer element
Follow the outer-element chart again to make the piece for the opposite side. The PDF includes separate left and right charts so the raised petals face outward when the pendant is assembled.
6. Stitch the center element
The center element uses the same basic peyote rhythm but has no petals standing beyond its edges. Its two 12-row cycles form sunflowers within the flat beaded surface.
Follow the central-element chart for the color order. After row 24, fold the strip and zip the edges together in the same way as the outer tubes. The sunflower closes across the seam as the final beads meet.
The center element starts at 21:43.
7. Assemble the pendant
Once all three tubes are finished, slide them onto a fine chain or cord. Place the two raised-petal elements on the outside and the straight-edged element in the center.
You can wear all three together, as shown in the tutorial, or use the center element alone for a smaller pendant.
Watch the final assembly at 37:14.
Video chapters
- 0:00: See the three pendant elements
- 2:23: Gather the beading materials
- 3:55: Start the peyote base
- 11:53: Form the raised sunflower petals
- 18:34: Zip the first tube
- 21:43: Make the center element
- 37:14: Assemble the pendant
A few practical reminders
- Hold the beadwork between two fingers with only the active row above your fingertips. This keeps the piece stable and makes the next bead easier to see.
- Pull the thread regularly so the beads sit closely together, especially before closing a seam.
- Work slowly. A tangled thread or misplaced bead is a normal part of beadwork, not a reason to rush the next row.
- Use the chart to mark your place. The repeated 12-row sections are easier to follow when you track the row as you finish it.
Frequently asked questions
Is this suitable for someone new to peyote stitch?
The project is detailed, but the video shows the first 12 rows of each element at normal speed. The free PDF also includes step-by-step diagrams starting on page 7. If this is your first peyote project, follow the video and the pattern together.
Do I have to make all three elements?
No. The center element can be worn alone. The full design uses all three tubes, with the raised-petal elements on the outside.
Can I change the colors?
Yes. The pattern allows different shades of yellow and green, or a completely different color combination. Keep a clear mapping between your colors and the chart letters.
How are the tubes held closed?
The open edges are zipped together by alternating through the protruding beads on each side. The thread ends are then woven diagonally through several beads in changing directions before they are trimmed.
Download the pattern and start beading
The free 24-page PDF contains the three charts, materials, bead counts, and detailed diagrams for the outer element.
You can purchase the downloadable PDF pattern in our online shop.
If a stitch is unclear, leave a question under the YouTube tutorial so the Ornamentico team can reply where other beaders can see the answer too.